Rabu, 31 Maret 2010
DNS Verification FTW
A few weeks ago, we introduced a new way of verifying site ownership, making it easy to share verified ownership of a site with another person. This week, we bring you another new way to verify. Verification by DNS record allows you to become a verified owner of an entire domain (and all of the sites within that domain) at once. It also provides an alternative way to verify for folks who struggle with the existing HTML file or meta tag methods.
I like to explain things by walking through an example, so let's try using the new verification method right now. For the sake of this example, we'll say I own the domain example.com. I have several websites under example.com, including http://www.example.com/, http://blog.example.com/ and http://beta.example.com/. I could individually verify ownership of each of those sites using the meta tag or HTML file method. But that means I'd need to go through the verification process three times, and if I wanted to add http://customers.example.com/, I'd need to do it a fourth time. DNS record verification gives me a better way!
First I'll add example.com to my account, either in Webmaster Tools or directly on the Verification Home page.
On the verification page, I select the "Add a DNS record" verification method, and follow the instructions to add the specified TXT record to my domain's DNS configuration.
When I click "Verify," Google will check for the TXT record, and if it's present, I'll be a verified owner of example.com and any associated websites and subdomains. Now I can use any of those sites in Webmaster Tools and other verification-enabled Google products without having to verify ownership of them individually.
If you try DNS record verification and it doesn't work right away, don't despair!
Sometimes DNS records take a while to make their way across the Internet, so Google may not see them immediately. Make sure you've added the record exactly as it’s shown on the verification page. We'll periodically check, and when we find the record we'll make you a verified owner without any further action from you.
DNS record verification isn't for everyone—if you don't understand DNS configuration, we recommend you continue to use the HTML file and meta tag methods. But for advanced users, this is a powerful new option for verifying ownership of your sites.
As always, please visit the Webmaster Help Forum if you have any questions.
Selasa, 30 Maret 2010
Letak sistem rating pada blog
Bagaimana anda menentukan samada mereka suka atau tidak entri pada blog.? Adakah semata² melalui komen yang di hantar.?
Kini dengan menggunakan sistem rating, anda dapat menilai tahap 'kesukaan' pengunjung blog anda terhadapa entri yang anda taip dengan lebih stylo.:)
Contoh sistem ini telah diletakkan di test blog
Cara untuk letak sistem ini agak senang kerana tidak memerlukan anda untuk ubah code html anda, semuanya tersedia dan anda hanya perlu ikuti beberapa langkah berikut.
1. Login akaun blogger anda.
2. Buka web http://www.outbrain.com
3. Pada paparan pilih option yang anda.
-->Digalakkan untuk mendaftar untuk mendapatkan maklumat rating dan juga (paling penting bagi aku) untuk membuang 'related post' yang didatangkan secara automatic dalam sistem ini.
4. Klik install dan paparan baru akan muncul
5. Pada paparan, pilih blog anda kemudian klik 'add widget'.
6. Selesai. (Anda boleh buat pengubahsuaianan daripada akaun yang anda telah buat sebelum ini)
URL removal explained, Part I: URLs & directories
There's a lot of content on the Internet these days. At some point, something may turn up online that you would rather not have out there—anything from an inflammatory blog post you regret publishing, to confidential data that accidentally got exposed. In most cases, deleting or restricting access to this content will cause it to naturally drop out of search results after a while. However, if you urgently need to remove unwanted content that has gotten indexed by Google and you can't wait for it to naturally disappear, you can use our URL removal tool to expedite the removal of content from our search results as long as it meets certain criteria (which we'll discuss below).
We've got a series of blog posts lined up for you explaining how to successfully remove various types of content, and common mistakes to avoid. In this first post, I'm going to cover a few basic scenarios: removing a single URL, removing an entire directory or site, and reincluding removed content. I also strongly recommend our previous post on managing what information is available about you online.
Removing a single URL
In general, in order for your removal requests to be successful, the owner of the URL(s) in question—whether that's you, or someone else—must have indicated that it's okay to remove that content. For an individual URL, this can be indicated in any of three ways:
- block the page from crawling via a robots.txt file
- block the page from indexing via a noindex meta tag
- indicate that the page no longer exists by returning a 404 or 410 status code
- robots.txt: You can check whether the URL is correctly disallowed using either the Fetch as Googlebot or Test robots.txt features in Webmaster Tools.
- noindex meta tag: You can use Fetch as Googlebot to make sure the meta tag appears somewhere between the <head> and </head> tags. If you want to check a page you can't verify in Webmaster Tools, you can open the URL in a browser, go to View > Page source, and make sure you see the meta tag between the <head> and </head> tags.
- 404 / 410 status code: You can use Fetch as Googlebot, or tools like Live HTTP Headers or web-sniffer.net to verify whether the URL is actually returning the correct code. Sometimes "deleted" pages may say "404" or "Not found" on the page, but actually return a 200 status code in the page header; so it's good to use a proper header-checking tool to double-check.
If a URL meets one of the above criteria, you can remove it by going to http://www.google.com/webmasters/tools/removals, entering the URL that you want to remove, and selecting the "Webmaster has already blocked the page" option. Note that you should enter the URL where the content was hosted, not the URL of the Google search where it's appearing. For example, enter
http://www.example.com/embarrassing-stuff.html
not
http://www.google.com/search?q=embarrassing+stuff
This article has more details about making sure you're entering the proper URL. Remember that if you don't tell us the exact URL that's troubling you, we won't be able to remove the content you had in mind.
Removing an entire directory or site
In order for a directory or site-wide removal to be successful, the directory or site must be disallowed in the site's robots.txt file. For example, in order to remove the http://www.example.com/secret/ directory, your robots.txt file would need to include:
User-agent: *
Disallow: /secret/
It isn't enough for the root of the directory to return a 404 status code, because it's possible for a directory to return a 404 but still serve out files underneath it. Using robots.txt to block a directory (or an entire site) ensures that all the URLs under that directory (or site) are blocked as well. You can test whether a directory has been blocked correctly using either the Fetch as Googlebot or Test robots.txt features in Webmaster Tools.
Only verified owners of a site can request removal of an entire site or directory in Webmaster Tools. To request removal of a directory or site, click on the site in question, then go to Site configuration > Crawler access > Remove URL. If you enter the root of your site as the URL you want to remove, you'll be asked to confirm that you want to remove the entire site. If you enter a subdirectory, select the "Remove directory" option from the drop-down menu.
Reincluding content
You can cancel removal requests for any site you own at any time, including those submitted by other people. In order to do so, you must be a verified owner of this site in Webmaster Tools. Once you've verified ownership, you can go to Site configuration > Crawler access > Remove URL > Removed URLs (or > Made by others) and click "Cancel" next to any requests you wish to cancel.
Still have questions? Stay tuned for the rest of our series on removing content from Google's search results. If you can't wait, much has already been written about URL removals, and troubleshooting individual cases, in our Help Forum. If you still have questions after reading others' experiences, feel free to ask. Note that, in most cases, it's hard to give relevant advice about a particular removal without knowing the site or URL in question. We recommend sharing your URL by using a URL shortening service so that the URL you're concerned about doesn't get indexed as part of your post; some shortening services will even let you disable the shortcut later on, once your question has been resolved.
Edit: Read the rest of this series:
Part II: Removing & updating cached content
Part III: Removing content you don't own
Part IV: Tracking requests, what not to remove
Companion post: Managing what information is available about you online
Posted by Susan Moskwa, Webmaster Trends Analyst
Will the Real <Your Site Here> Please Stand Up?
In our recent post on the Google Online Security Blog, we described our system for identifying phishing pages. Of the millions of webpages that our scanners analyze for phishing, we successfully identify 9 out of 10 phishing pages. Our classification system only incorrectly flags a non-phishing site as a phishing site about 1 in 10,000 times, which is significantly better than similar systems. In our experience, these “false positive” sites are usually built to distribute spam or may be involved with other suspicious activity. If you find that your site has been added to our phishing page list (”Reported Web Forgery!”) by mistake, please report the error to us. On the other hand, if your site has been added to our malware list (”This site may harm your computer”), you should follow the instructions here. Our team tries to address all complaints within one day, and we usually respond within a few hours.
Unfortunately, sometimes when we try to follow up on your reports, we find that we are just as confused as our automated system. If you run a website, here are some simple guidelines that will allow us to quickly fix any mistakes and help keep your site off our phishing page list in the first place.
- Don’t ask for usernames and passwords that do not belong to your site. We consider this behavior phishing by definition, so don’t do it! If you want to provide an add-on service to another site, consider using a public API or OAuth instead.
- Avoid displaying logos that are not yours near login fields. Someone surfing the web might mistakenly believe that the logo represents your website, and they might be misled into entering personal information into your site that they intended for the other site. Furthermore, we can’t always be sure that you aren’t doing this intentionally, so we might block your site just to be safe. To prevent misunderstandings, we recommend exercising caution when displaying these logos.
- Minimize the number of domains used by your site, especially for logins. Asking for a username and password for Site X looks very suspicious on Site Y. Besides making it harder for us to evaluate your website, you may be inadvertently teaching your visitors to ignore suspicious URLs, making them more vulnerable to actual phishing attempts. If you must have your login page on a different domain from your main site, consider using a transparent proxy to enable users to access this page from your primary domain. If all else fails...
- Make it easy to find links to your pages. It is difficult for us (and for your users) to determine who controls an off-domain page in your site if the links to that page from your main site are hard to find. All it takes to clear this problem up is to have each off-domain page link back to an on-domain page which links to it. If you have not done this, and one of your pages ends up on our list by mistake, please mention in your error report how we can find the link from your main site to the wrongly blocked page. However, if you do nothing else...
- Don’t send strange links via email or IM. It’s all but impossible for us to verify unusual links that only appeared in your emails or instant messages. Worse, using these kinds of links conditions your users/customers/friends to click on strange links they receive through email or IM, which can put them at risk for other Internet crimes besides phishing.
While we hope you consider these recommendations to be common sense, we’ve seen major e-commerce and financial companies break these guidelines from time to time. Following them will not only improve your experience with our anti-phishing systems, but will also help provide your visitors with a better online experience.
Written by Colin Whittaker, Anti-Phishing Team
Rabu, 24 Maret 2010
Youtube : Video Player kepada MP3 Player
Tutorial ini akan menerangkan bagaimana untuk menjadikan video dari youtube kepada bentuk mp3 player.
Contoh anda ingin menukarkan video ini dalam bentuk mp3 player.
kepada
-----------
Tutorial untuk menukarkan keadaan ini adalah:
1. Dapatkan link video (URL) dari youtube.
Contoh untuk lagu di atas:
http://www.youtube.com/watch?v=_eYj0B5LwOo
2. Buang 'watch?' dan gantikan '=' kepada '/'
Contoh :
http://www.youtube.com/watch?v=_eYj0B5LwOo kepada
http://www.youtube.com/v/_eYj0B5LwOo
3.Masukkan link yang anda telah ubah ke dalam kod berikut.
<embed width="425" height="25" allowscriptaccess="always" type="application/x-shockwave-flash" src="LINK DISINI"></embed>
contoh untuk kod di atas.
<embed width="425" height="25" allowscriptaccess="always" type="application/x-shockwave-flash" src="http://www.youtube.com/v/_eYj0B5LwOo"></embed>
4.Dan hasilnya.
Senang bukan.?.:)
Minggu, 21 Maret 2010
Letak Ruangan Komen Di Bawah Entri.
Secara asasnya, blogger sudah menyediakan cara mudah untuk membolehkan sistem komen dalam blog anda muncul seperti ini.
Apa yang perlu dilakukan adalah enablekan sistem komen ini cara berikut.
1. Login akaun blogger anda, dari dashboard> settings>comments
Pada comments form placement, pilih 'embedded below post'
2. Save setting dan lihat hasilnya..
JIKA tidak berjaya.
3. Klik pada layout>edit html>Expand widget templates
4. Backup template anda dengan klik 'download full template'.
5. Tekan ctrl + F untuk mencari kod dibawah.
<b:include data='post' name='comments'/>
6. Letakkan kod ini dibawah kod yang anda jumpa pada langkah 5.
<b:include data='post' name='comment-form'/>
7. Save template anda dan lihat hasilnya.
Jumat, 19 Maret 2010
Working with multilingual websites
A multilingual website is any website that offers content in more than one language. Examples of multilingual websites might include a Canadian business with an English and a French version of its site, or a blog on Latin American soccer available in both Spanish and Portuguese.
Usually, it makes sense to have a multilingual website when your target audience consists of speakers of different languages. If your blog on Latin American soccer aims to reach the Brazilian audience, you may choose to publish it only in Portuguese. But if you’d like to reach soccer fans from Argentina also, then providing content in Spanish could help you with that.
Google and language recognition
Google tries to determine the main languages of each one of your pages. You can help to make language recognition easier if you stick to only one language per page and avoid side-by-side translations. Although Google can recognize a page as being in more than one language, we recommend using the same language for all elements of a page: headers, sidebars, menus, etc.
Keep in mind that Google ignores all code-level language information, from “lang” attributes to Document Type Definitions (DTD). Some web editing programs create these attributes automatically, and therefore they aren’t very reliable when trying to determine the language of a webpage.
Someone who comes to Google and does a search in their language expects to find localized search results, and this is where you, as a webmaster, come in: if you’re going to localize, make it visible in the search results with some of our tips below.
The anatomy of a multilingual site: URL structure
There's no need to create special URLs when developing a multilingual website. Nonetheless, your users might like to identify what section of your website they’re on just by glancing at the URL. For example, the following URLs let users know that they’re on the English section of this site:
http://example.ca/en/mountain-bikes.html
http://en.example.ca/mountain-bikes.html
While these other URLs let users know that they’re viewing the same page in French:
http://example.ca/fr/mountain-bikes.html
http://fr.example.ca/mountain-bikes.html
Additionally, this URL structure will make it easier for you to analyze the indexing of your multilingual content.
If you want to create URLs with non-English characters, make sure to use UTF-8 encoding. UTF-8 encoded URLs should be properly escaped when linked from within your content. Should you need to escape your URLs manually, you can easily find an online URL encoder that will do this for you. For example, if I wanted to translate the following URL from English to French,
http://example.ca/fr/mountain-bikes.html
It might look something like this:
http://example.ca/fr/vélo-de-montagne.html
Since this URL contains one non-English character (é), this is what it would look like properly escaped for use in a link on your pages:
http://example.ca/fr/v%C3%A9lo-de-montagne
Crawling and indexing your multilingual website
We recommend that you do not allow automated translations to get indexed. Automated translations don’t always make sense and they could potentially be viewed as spam. More importantly, the point of making a multilingual website is to reach a larger audience by providing valuable content in several languages. If your users can’t understand an automated translation or if it feels artificial to them, you should ask yourself whether you really want to present this kind of content to them.
If you’re going to localize, make it easy for Googlebot to crawl all language versions of your site. Consider cross-linking page by page. In other words, you can provide links between pages with the same content in different languages. This can also be very helpful to your users. Following our previous example, let’s suppose that a French speaker happens to land on http://example.ca/en/mountain-bikes.html; now, with one click he can get to http://example.ca/fr/vélo-de-montagne.html where he can view the same content in French.
To make all of your site's content more crawlable, avoid automatic redirections based on the user's perceived language. These redirections could prevent users (and search engines) from viewing all the versions of your site.
And last but not least, keep the content for each language on separate URLs - don't use cookies to show translated versions.
Working with character encodings
Google directly extracts character encodings from HTTP headers, HTML page headers, and content. There isn’t much you need to do about character encoding, other than watching out for conflicting information - for example, between content and headers. While Google can recognize different character encodings, we recommend that you use UTF-8 on your website whenever possible.
If your tongue gets twisted...
Now that you know all of this, your tongue may get twisted when you speak many languages, but your website doesn’t have to!
For more information, read our post on multi-regional sites and stay tuned for our next post, where we'll delve into special situations that may arise when working with global websites. Until then, don't hesitate to drop by the Help Forum and join the discussion!
Written by Xavier deMorales, Google Search Quality
Senin, 15 Maret 2010
Sharing advice from our site clinic
Members of the Google Search Quality Team have participated in site clinic panels on a number of occasions. We receive a lot of positive feedback from these events and we've been thinking of ways to expand our efforts to reach even more webmasters. We decided to organize a small, free of charge pilot site clinic at Google in Dublin, and opened the invitation to webmasters from the neighborhood. The response we received was overwhelming and exceeded our expectations.
Meet the Googlers who hosted the site clinic: Anu Ilomäki, Alfredo Pulvirenti, Adel Saoud, Fili Wiese, Kaspar Szymanski and Uli Lutz.
It was fantastic to see the large turnout and we would like to share the slides presented as well as the takeaways.
These are some questions we came across, along with the advice shared:
- I have 3 blogs with the same content, is that a problem?
If the content is identical, it's likely only one of the blogs will rank for it. Also, with this scattered of an effortwith this scattered of an effort chances are your incoming links will be distributed across the different blogs, instead of pointing to one source. Therefore you're running the risk of both users and search engines not knowing which of your blogs is the definitive source. You can mitigate that by redirecting to the preferred version or using the cross domain canonical to point to one source. - Should I believe SEO agencies that promise to make my site rank first in Google in a few months and with a precise number of links?
No one can make that promise; therefore the short answer is no, you should not. However, we have some great tips on how to find a trustworthy SEO in our Help Center. - There are keywords that are relevant for my website, but they're inappropriate to be shown in the content e.g. because they could be misunderstood, slang or offensive. How can I show the relevance to Google?
Depending on the topic of your site and expectations of the target group, you might consider actually using these keywords in a positive way, e.g. explaining their meaning and showing your users you're an authority on the subject. However if the words are plain abusive and completely inappropriate for your website, it's rather questionable whether the traffic resulting from these search queries is interesting for your website anyway. - Would you advise to use the rewrite URL function?
Some users may like seeing descriptive URLs in the search results. However, it's quite hard to correctly create and maintain rewrites that change dynamic URLs to static-looking URLs. That's why, generally speaking, we don't recommend rewriting them. If you still want to give it a try, please be sure to remove unnecessary parameters while maintaining a dynamic-looking URL and have a close look at our blog post on this topic. And if you don't, keep in mind that we might still make your URLs look readable in our search results no matter how weird they actually are. - If I used the geo-targeting tool for Ireland, is Northern Ireland included?
Google Webmaster Tools geo-targeting works on a country basis, which means that Northern Ireland would not be targeted if the setting was Republic of Ireland. One possible solution is to create a separate site or part of a website for Northern Ireland and to geo-target this site to the United Kingdom in Webmaster Tools. - Is there any preference between TLDs like .com and .info in ranking?
No, there is none. Our focus is on the content of the site. - I have a website on a dot SO (.so) domain name with content meant for the Republic of Ireland. Will this hurt my rankings in the Irish search results?
.so is the Internet country code top-level domain for Somalia. This is one factor we look into not pointing to the desired destination. But we do look at a larger number of factors when ranking your website. The extension of the domain name is just one of these. Your website can still rank in the Irish search results if you have topic-specific content. However, keep in mind that it may take our algorithms a little bit longer to fully understand where to best serve your website in our search results.
Posted by Kaspar Szymanski, Search Quality Strategist, Dublin
Minggu, 14 Maret 2010
Letak kesan salji dalam blog (Snow effect)
Apa kata kalau sejukkan sedikit blog anda dengan meletakkan salji yang berterusan jatuh dari atas blog anda.:)
Untuk tutorial ini akan diletakkan 2 kod iaitu untuk salji putih dan salji hitam(ada juga salji hitam ye.:)
Demo untuk salji bewarna hitam boleh dilihat disini. DEMO
Cara untuk meletakkan salji dalam blog adalah seperti berikut.
1. Login akaun blogger, dari dashboard>layout>add a gadget>html/javascript
2. Copy salah satu kod berikut kemudian paste dalam ruangan html/javascript
Kod untuk salji putih (sesuai untuk background hitam)
<script type="text/javascript" src="http://www.yourjavascript.com/14104214083/snow-white.js"></script>
Kod untuk salji hitam (sesuai untuk background putih)
<script type="text/javascript" src="http://www.yourjavascript.com/03441140321/snow-black.js"></script>
3. Save dan lihat hasilnya.:)
Sabtu, 13 Maret 2010
Cara Buat Perkataan Bergerak (Scrolling/Marquee Text)
Walaupun pergerakan ini menarik minat, tetapi tidak digalakkan untuk diletakkan terlalu banyak di dalam blog kerana dibimbangi keadaan 'menarik' bertukar 'menyerabutkan'.:)
Berikut adalah tutorial untuk membuat perkataan bergerak.
Tutorial ini akan dimulakan dengan kaedah paling asas dan juga diletakkan penambahan.
1. Kod asas untuk perkataan bergerak (dari kiri ke kanan adalah)
<marquee>Contoh scrolling text</marquee>
Output untuk kod ini seperti berikut:
2. Ubah pergerakan perkataan
Penambahan kod berikut diperlukan dalam kod asal.
direction="left"
direction="right"
direction="up"
direction="down"
Berikut contoh kod untuk pegerakan dari kanan ke kiri
<marquee direction="right" >Contoh scrolling text</marquee>
Output untuk kod ini adalah
3.Ubah warna background
Untuk ubah background, perlu diletakkan kod berikut
bgcolor="#kod warna"
Senarai kod warna boleh didapati disini.
Contoh kod yang diletakkan background,
<marquee direction="right" bgcolor="#99CCFF">Contoh scrolling text</marquee>
Output untuk kod ini adalah
4. Perkataan dalam keadaan 'anjal'
Penambahan kod berikut diperlukan ke dalam kod asal.
behavior="alternate"
contoh kod yang diletakkan trick ini.
<marquee behavior="alternate" bgcolor="#99CCFF">Contoh scrolling text</marquee>
Output untuk kod ini
5.Ubah kelajuan perkataan.
Pergerakan juga dapat diubah dengan menambah kod berikut
scrollamount="2"
Contoh kod dengan trick ini.
<marquee behavior="alternate" direction="left" bgcolor="#99CCFF" scrollamount="2">Contoh scrolling text</marquee>
Output:
Scrollamount :2
Scrollamount :4
6. Pause apabila cursor dilalukan.
Perkataan yang bergerak juga dapat dihentikan apabila dilalukan cursor. Kebiasaannya ini untuk memudahkan pengunjung untuk membaca apa yang ingin disampaikan tanpa ganguan.
Penambahan kod yang perlu dilakukan adalah
onmouseover="this.stop()" onmouseout="this.start()"
Contoh kod dengan trick ini.
<marquee behavior="alternate" direction="left" bgcolor="#99CCFF" onmouseover="this.stop()" onmouseout="this.start()" scrollamount="2" >Contoh scrolling text</marquee>
output untuk trick ini.
Jumat, 12 Maret 2010
Working with multi-regional websites
Did you know that a majority of users surveyed feel that having information in their own language was more important than a low price? Living in a non-English-speaking country, I've seen friends and family members explicitly look for and use local and localized websites—properly localized sites definitely have an advantage with users. Google works hard to show users the best possible search results. Many times those are going to be pages that are localized, for the user's location and/or in the user's language.
If you're planning to take the time to create and maintain a localized version of your website, making it easy to recognize and find is a logical part of that process. In this blog post series, we'll take a look at what is involved with multi-regional and multi-lingual websites from a search engine point of view. A multi-regional website is one that explicitly targets users in various regions (generally different countries); we call it multilingual when it is available in multiple languages, and sometimes, the website targets both multiple regions and is in multiple languages. Let's start with some general preparations and then look at websites that target multiple regions.
Preparing for global websites
Expanding a website to cover multiple regions and/or languages can be challenging. By creating multiple versions of your website, any issues with the base version will be multiplied; make sure that you have everything working properly before you start. Given that this generally means you'll suddenly be working with a multiplied number of URLs, don't forget that you'll need appropriate infrastructure to support the website.Planning multi-regional websites
When planning sites for multiple regions (usually countries), don't forget to research legal or administrative requirements that might come into play first. These requirements may determine how you proceed, for instance whether or not you would be eligible to use a country-specific domain name.All websites start with domain names; when it comes to domain names, Google differentiates between two types of domain names:
- ccTLDs (country-code top level domain names): These are tied to a specific country (for example .de for Germany, .cn for China). Users and search engines use this as a strong sign that your website is explicitly for a certain country.
- gTLDs (generic top level domain names): These are not tied to a specific country. Examples of gTLds are .com, .net, .org, .museum. Google sees regional top level domain names such as .eu and .asia as gTLDs, since they cannot be tied to a specific country. We also treat some vanity ccTLDs (such as .tv, .me, etc.) as gTLDs as we've found that users and webmasters frequently see these as being more generic than country-targeted (we don't have a complete list of such vanity ccTLDs that we treat as gTLDs as it may change over time). You can set geotargeting for websites with gTLDs using the Webmaster Tools Geographic Target setting.
Geotargeting factors
Google generally uses the following elements to determine the geotargeting of a website (or a part of a website):- Use of a ccTLD is generally a strong signal for users since it explicitly specifies a single country in an unmistakable way.
or
Webmaster Tools' manual geotargeting for gTLDs (this can be on a domain, subdomain or subdirectory level); more information on this can be found in our blog post and in the Help Center. With region tags from geotargeting being shown in search results, this method is also very clear to users. Please keep in mind that it generally does not make sense to set a geographic target if the same pages on your site target more than a single country (say, all German-speaking countries) — just write in that language and do not use the geotargeting setting (more on writing in other languages will follow soon!). - Server location (through the IP address of the server) is frequently near your users. However, some websites use distributed content delivery networks (CDNs) or are hosted in a country with better webserver infrastructure, so we try not to rely on the server location alone.
- Other signals can give us hints. This could be from local addresses & phone numbers on the pages, use of local language and currency, links from other local sites, and/or the use of Google's Local Business Center (where available).
Note that we do not use locational meta tags (like "geo.position" or "distribution") or HTML attributes for geotargeting. While these may be useful in other regards, we've found that they are generally not reliable enough to use for geotargeting.
URL structures
The first three elements used for geotargeting are strongly tied to the server and to the URLs used. It's difficult to determine geotargeting on a page by page basis, so it makes sense to consider using a URL structure that makes it easy to segment parts of the website for geotargeting. Here are some of the possible URL structures with pros and cons with regards to geotargeting:ccTLDs eg: example.de, example.fr | Subdomains with gTLDs eg: de.site.com, fr.site.com, etc. | Subdirectories with gTLDs eg: site.com/de/, site.com/fr/, etc. | URL parameters eg: site.com?loc=de, ?country=france, etc. |
pros (+) - clear geotargeting - server location is irrelevant - easy separation of sites - legal requirements (sometimes) | pros (+) - easy to set up - can use Webmaster Tools geotargeting - allows different server locations - easy separation of sites | pros (+) - easy to set up - can use Webmaster Tools geotargeting - low maintenance (same host) | pros (+) (not recommended) |
cons (-) - expensive (+ availability) - more infrastructure - ccTLD requirements (sometimes) | cons (-) - users might not recognize geotargeting from the URL alone (is "de" the language or country?) | cons (-) - users might not recognize geotargeting from the URL alone - single server location - separation of sites harder | cons (-) - segmentation based on the URL is difficult - users might not recognize geotargeting from the URL alone - geotargeting in Webmaster Tools is not possible |
As you can see, geotargeting is not an exact science (even sites using country-code top level domain names can be global in nature), so it's important that you plan for the users from the "wrong" location. One way to do this could be to show links on all pages for users to select their region and language of choice. We'll look at some other possible solutions further on in this blog post series.
Dealing with duplicate content on global websites
Websites that provide content for different regions and in different languages sometimes create content that is the same or similar but available on different URLs. This is generally not a problem as long as the content is for different users in different countries. While we strongly recommend that you provide unique content for each different group of users, we understand that this may not always be possible for all pages and variations from the start. There is generally no need to "hide" the duplicates by disallowing crawling in a robots.txt file or by using a "noindex" robots meta tag. However, if you're providing the same content to the same users on different URLs (for instance, if both "example.de/" and "example.com/de/" show German language content for users in Germany), it would make sense to choose a preferred version and to redirect (or use the "rel=canonical" link element) appropriately.Do you already have a website that targets multiple regions or do you have questions about the process of planning one? Come to the Help Forum and join the discussion. In following posts, we'll take a look at multi-lingual websites and then look at some special situations that can arise with global websites. Bis bald!
Written by John Mueller, Webmaster Trends Analyst, Google Switzerland
Kamis, 11 Maret 2010
Letak Gambar Sebelah Tajuk Entri
Antara salah satu perkara untuk menambahkan seri tajuk entri adalah dengan meletakkan gambar disebelah tajuk entri.
Contoh:
Berikut adalah langkah-langkah yang perlu dilakukan.
1.Login akaun blogger, dari dashboard >layout > edit html > expand widget templates
2.Tekan ctrl + F untuk menghidupkan fungsi 'find' kemudian cari kod berikut.
<a expr:href='data:post.url'><data:post.title/></a>
3. Letakkan kod dibawah antara kod <a expr:href='data:post.url'> dan kod <data:post.title/></a>
<img src="url gambar"/>
Contoh kod sepatutnya kelihatan seperti ini
Nota:
a. Tukarkan 'url gambar' dengan url gambar yang anda kehendaki
b. Saiz gambar yang biasa digunakan adalah dalam lingkungan 20x20 hingga 30x30.
4. Preview, dan jika anda berpuas hati klik save template.:)
Microdata support for Rich Snippets
HTML5 is the fifth major revision of HTML, the core language of the World Wide Web. The HTML5 specification includes a description of microdata, a new markup standard for specifying structured information within web pages.
Today, we’re happy to announce support for microdata for use in rich snippets in addition to our existing support for microformats and RDFa. By using microdata markup in your web pages, you can specify reviews, people profiles, or events information on your web pages that Google may use to improve the presentation of your pages in Google search results.
Here is a simple HTML block showing a section of a review of “L’Amourita Pizza”:
Here is the same HTML with microdata added to specify the restaurant being reviewed, the author and date of the review, and the rating:
Microdata has the nice property of balancing richness with simplicity. As you can see, it’s easy to add markup to your pages using a few HTML attributes like itemscope (to define a new item), itemtype (to specify the type of item being described), and itemprop (to specify a property of that item). Once you’ve added markup to a page, you can test it using the rich snippets testing tool to make sure that Google can parse the data on your page.
As with microformats and RDFa, the vocabulary that we support -- including which item types and item properties are understood by Google -- is specified in our rich snippets documentation as well as on data-vocabulary.org. Marking up your content does not guarantee that rich snippets will show for your site; Google will expand the use of microdata markup gradually to ensure a great user experience.
To get started, here are some helpful links:
- Rich snippets documentation
- Overview of microdata
- Official microdata specification
- Rich snippets testing tool
Written by Siddhartha Chattopadhyay, Kavi Goel, Ramanathan V. Guha, Pravir Gupta, Othar Hansson
Selasa, 09 Maret 2010
Letak Tajuk Entri Pada Read More
Tutorial ini akan menerangkan bagaimana untuk menambah sedikit kod daripada tutorial readmore sebelum ini untuk membolehkan tajuk entri keluar secara automatic selepas perkataan 'readmore' (atau perkataan lain berkaitan'.
Sebelum
Selepas
Cara-cara untuk meletakkan kod untuk trick ini adalah seperti berikut.
1. Login akaun blogger dari dashboard > layout > edit HTML > expand widget templates
2. Klik ctrl + F untuk menghidupkan fungsi find kemudian cari kod berikut
<data:post.body/>
3. Dibawah kod <data:post.body/> , ada beberapa kod yang berkaitan dengan readmore, dan buat penambahan kod dibawah selepas perkataan 'readmore'(atau perkataan lain yang berkaitan)
-pastikan kod ini terletak sebelum </a>
<data:post.title/>
Lihat contoh dibawah untuk memudahkan.
4.Apabila selesai anda boleh save dan lihat hasilnya.:)
Senin, 08 Maret 2010
Tukar Warna Background Blockquote
Bagi blog, kod yang digunakan untuk blockquote adalah <blockquote> APA² PETIKAN</blockquote>. Selain untuk menunjukkan petikan kata, blockquote juga digunakan untuk tujuan lain seperti mempamerkan kod (seperti yang dilakukan dalam blog ini)
Tutorial ini akan menunjukkan cara untuk menukar warna background bagi blockquote mengikut citarasa seseorang blogger.
Contoh blockquote yang telah ditukar warna background.
Cara untuk tukar warna background adalah seperti berikut.
1. Login akaun blogger, dari dashboard >layout > edit html >
2. Gunakan ctrl + F untuk menghidupkan fungsi find kemudian cari kod berikut.
.post blockquote {
3. Dibawah kod ini, masukkan kod berikut.
background:#KOD WARNA ;
KOD WARNA: boleh dapatkan merujuk kepada kod dibawah.
contoh:kod sepatutnya kelihatan seperti ini.
4. Save dan lihat hasilnya.
---------------
Sila rujuk web dibawah untuk kod gambar. Jika mahu dalam paparan windows berlainan, sila KLIK SINI
Fetch as Googlebot Mobile and Claim your Sidewiki comment - added to Webmaster Tools Labs!
Last October, we launched Webmaster Tools Labs and it has been a huge success. Malware Details have helped thousands of users identify pages on their site that may be infected with malicious code, and Fetch as Googlebot has given users more insight into our crawler.
Today, we're happy to announce two additional Labs features:
- Fetch as Googlebot-Mobile
- Create your Sidewiki page owner entry
Fetch as Gooblebot Mobile (developed by Ryoichi Imaizumi)
After we launched Fetch as Googlebot, many users with mobile-specific sites asked if we could provide the ability to fetch their pages as Googlebot-Mobile. We thought it was a great idea, and added it as an option to our Fetch as Googlebot feature. We have two mobile options: cHTML (primarily used for Japanese sites), and XHTML/WML.
Create your Sidewiki page owner entry (developed by Derek Prothro)
Sidewiki allows users to contribute helpful information to any webpage using a sidebar in Google Toolbar or a Chrome extension. Webmasters can create a special entry, called a page owner entry, that appears above all entries written by users.
After Sidewiki launched webmasters kept asking, "How can I put a Sidewiki page owner entry on all pages of my site quickly?" With the feature that we're introducing today, you can now create these page owner entries directly within Webmaster Tools for any site you own.
We're really happy about these new features, and hope you enjoy them as much as we do. Let us know what you think!
Written by Sagar Kamdar, Product Manager, Webmaster Tools
Minggu, 07 Maret 2010
Letak Website Lain Dalam Entri
Bagaimana pula untuk meletakkan website hanya di dalam sesebuah entri.?
Tutorial ini pula akan menunjukkan cara untuk meletakkan website lain dalam entri blog dengan cara paling mudah..
Apabila anda menaip dalam blog anda, cuma tambahkan code ini untuk meletakkan website lain dalam entri blog anda.
<iframe src="LINK DISINI" width="98%" height="400" border="1"></iframe>
Link Disini : Masukkan url website yang anda kehendaki, contoh http://www.google.com
(pastikan anda tidak tertinggal http:// )
Contoh meletakkan youtube dalam entri blog adalah seperti berikut.
Jadi, jika anda membuat entri yang memerlukan pengunjung blog anda membuka website lain(mungkin sebagai bukti atau apa), biarkan pengunjung anda mencari terus di dalam entri yang anda post.:)
Sabtu, 06 Maret 2010
Cara Buat Dropdown Menu
Contoh dropdown menu adalah seperti berikut
Tutorial untuk membuat dropdown menu ini adalah seperti berikut.
1. Login akaun blogger anda, dari dashboard > layout > page element > add a gadget > HTML/javascript
2. Copy code berikut ke dalam ruangan html/javascript. (jika tidak faham rujuk sini)
<select onChange="document.location.href=this.options[this.selectedIndex].value;">
<option selected>Tajuk</option>
<option value="Link 1">Text 1</option>
<option value="Link 2">Text 2</option>
</select>
penerangan :
Link 1: Masukkan link untuk dibuka
Text 1: Masukkan perkataan/ayat untuk link
Jika anda hendak masukkan lebih banyak menu, cuma copy paste <option value="Link 2">Text 2</option> dan letakkan sebelum </select>
3. Apabila selesai, save hasil kerja anda.:)
TAMBAHAN:
Untuk kod di atas, apabila link akan dibuka pada page yang sama. Untuk buka link pada page/window yang berlainan, sila tukarkan kod:
<select onChange="document.location.href=this.options[this.selectedIndex].value;">
kepada kod ini.
<select onchange="javascript:window.open(this.options[this.selectedIndex].value);">
Mudah bukan.
Selamat mencuba.:)
Kamis, 04 Maret 2010
Ubah Lebar Ruangan Komen
Tutorial ini akan menunjukkan cara untuk melebarkan ruangan komen, dan tutorial ini hanya untuk blog yang menggunakan embedded comment (komen yang terletak pada bahagian bawah entri)
.
Sebelum
Selepas
Berikut adalah langkah-langkah yang diperlukan untuk mengubah lebar ruangan komen pada blog.
1. Login akaun blogger anda, dari dashboard > layout > edit html, kemudian klik pada expand widget templates.
2. Pda keyboard anda, klik ctrl + f untuk menghidupkan fungsi find kemudian cari kod berikut.
<iframe allowtransparency='true' class='blogger-iframe-colorize' frameborder='0' height='275' id='comment-editor' scrolling='no' src='' width='100%'/>
Penerangan : Tukar nilai 100% kepada nilai pixel untuk lebar yang anda kehendaki.
contoh, jika anda mahu lebar 500px, kodnya adalah
<iframe allowtransparency='true' class='blogger-iframe-colorize' frameborder='0' height='275' id='comment-editor' scrolling='no' src='' width='500px'/>
3. Save hasil kerja anda dan lihat hasilnya.:)
Selasa, 02 Maret 2010
Sharing the verification love
Everything is more fun with a friend! We've just added a feature to Webmaster Tools Site Verification to make it easier to share verified ownership of your websites.
In the past, if more than one person needed to be a verified owner of a website, they each had to go through the meta tag or HTML file verification process. That works fine for some situations, but for others it can be challenging. For example, what if you have twenty people who need to be verified owners of your site? Adding twenty meta tags or HTML files could be pretty time consuming. Our new verification delegation feature makes adding new verified owners a snap.
Once you're a verified owner of a website, you can view the Verification Details page (linked from Webmaster Tools or the Verification home page). That page will show you information about the site as well as a list of any other verified owners. At the bottom of the list of owners, you'll now see a button labeled "Add a user...". Click that, enter the user's email address, and that person will instantly become a verified owner for the site! You can remove that ownership at any time by clicking the "Unverify" link next to the person's email address on the Details page.
There are a few important things to keep in mind as you use this feature. First, each site must always have at least one owner who has verified directly (via meta tag or HTML file). If all of the directly verified owners become unverified, the delegated owners may also become unverified. Second, you can only delegate ownership to people with Google Accounts. Finally, remember that anyone you delegate ownership to will have exactly the same access you have. They can delegate to more people, submit URL Removal requests and manage Sitelinks in Webmaster Tools, etc. Only delegate ownership to people you trust!
We hope this makes things a little easier for those of you who need more than one person to be a verified owner of your site. As always, please visit the Webmaster Help Forum if you have any questions.
Sean Harding, Software Engineer
Google's SEO Report Card
How many of Google's web pages use a descriptive title tag? Do we use description meta tags? Heading tags? While we always try to focus on the user, could our products use an SEO tune up? These are just some of the questions we set out to answer with Google's SEO Report Card.
Google's SEO Report Card is an effort to provide Google's product teams with ideas on how they can improve their products' pages using simple and accepted optimizations. These optimizations are intended to not only help search engines understand the content of our pages better, but also to improve our users' experience when visiting our sites. Simple steps such as fixing 404s and broken links, simplifying URL choice, and providing easier-to-understand titles and snippets for our pages can benefit both users and search engines. From the start of the project we also wanted to release the report card publicly so other companies and webmasters could learn from the report, which is filled with dozens of examples taken straight from our products' pages.
The project looked at the main pages of 100 different Google products, measuring them across a dozen common optimization categories. Future iterations of the project might look at deeper Google product web pages as well as international ones. We released the report card within Google last month and since then a good number of teams have taken action on it or plan to.
We hope you find our SEO Report Card useful and we'd love to hear your feedback in the comments below or in the Webmaster Central Help Forum. And if you'd like to do your own SEO tune up, a good place to start is by reading our free SEO Beginner's Guide.
Written by Brandon Falls, Adi Goradia, and Charlene Perez, Search Quality Team
Ketahui Bilangan Pengunjung Online Dalam Blog
Mungkin amat sukar untuk anda menjangkakannya (tidak boleh rasanya.:)
Kalau anda mempunyai statistik blog, mungkin anda tahu mengikut hari ataupun jam,
tetapi anda tidak tahu berapa bilangan pengunjung dalam keadaan masa sebenar.
whous.amung.us menawarkan widget yang dapat menunjukkan bilangan pengunjung yang online pada masa sebenar.
Antara kelebihan menggunakan widget ini adalah paparan yang menarik, dan juga cara pasang pada blog dengan mudah. Boleh lihat demo widget ini dipasang di blog, DISINI.
Berikut adalah langkah yang diperlukan untuk meletakkan widget ini didalam blog anda.
1. Buka web http://whos.amung.us/
2. Pilih kedudukan widget yang dikehendaki (widget akan berada dalam keadaan statik dalam blog anda), selepas itu copy code yang tersedia.
3. Setelah copy code, pastekan di dalam html/javascript yang terdapat dalam page element blog anda.
Dashboard > layout > page element > add a gadget > html/javascript.
Jika masih tidak faham, sila rujuk disini.
4. Save, dan lihat hasilnya..:)
Senin, 01 Maret 2010
Tukar Ayat Asal Linkwithin
Bagi bahasa melayu, akan keluar ayat, "Anda mungkin juga meminati" dan bagi english "You may also like these stories"..
Ini adalah yang biasa,
Dan ini pula yang agak kurang biasa.:)
Anda ingin tukar ayat ini mengikut kehendak anda.?
Ikuti tutorial yang sangat mudah ini.:)
1. Login akaun anda, kemudian dari dashboard > layout
2.Dari page element yang dipaparkan, cari element untuk Linkwithin kemudian klik edit
3. Daripada kod yang dipaparkan, tambah kod ini dibahagian atasnya
<script>linkwithin_text='AYAT ANDA DISINI'</script>
Penerangan : Tukarkan "AYAT ANDA DISINI" dengan apa-apa yang anda kehendaki.:)
Kod anda sepatutnya kelihatan seperti ini.
4. Selepas selesai, klik save untuk lihat kesannya..
Senang bukan.:)
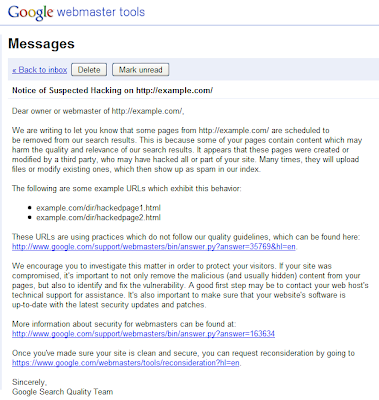
Is your site hacked? New Message Center notifications for hacking and abuse
- Spammy or abused user-generated content
- Abused forum pages or egregious amounts of comment spam
- Suspected hacking
Posted by Jessica Wong and Jason Morrison, Search Quality Team
Buat Read More Dalam Blog : Cara 2
Sebenarnya kaedah ini sudahpun agak lama wujud dalam blogger.com, tetapi mungkin pengguna blogspot tidak perasan. Dan bagi blogger yang menggunakan template asal daripada blogger.com, kaedah ini amat mudah untuk diaplikasikan.
Berikut tutorial ringkas untuk buat read more yang sudah tersedia dalam blogger.com
1. Login ke akaun blogger anda, kemudian daripada dashboard klik new post.
2. Kemudian taipkan beberapa patah perkataan, kemudian diselangi oleh kod berikut. (Ini untuk test template anda sudah tersedia dengan kod penuh atau belum)
<!-- more -->
contoh: anda boleh copy dan paste bawah ni ke dalam new post anda.
Ini ayat sebelum perkataan 'read more'
<!-- more -->
Ini ayat selepas perkataan 'read more'
3. Kemudian klik pada publish, dan tengok dari paparan muka hadapan blog anda samada read more ini berjaya atau tidak. Kalau berjaya, kerja anda sudah siap.:)
Kalau tidak berjaya,
(biasanya melibatkan bukan template default dari blogger), sila ikuti sedikit penambahan berikut.
1. Dari dashboard, klik pada layout > edit html
2. Backup template anda, kemudian klik pada expand widget templates
3. Menggunakan keyboard, tekan ctrl + f (untuk membuka fungsi find), kemudian cari kod berikut
<data:post.body/>
4. Copy dan paste kod ini dan letakkan dibawah kod tadi.
<b:if cond='data:post.hasJumpLink'>
<div class='jump-link'>
<a expr:href='data:post.url + "#more"'><data:post.jumpText/></a>
</div>
</b:if >
5. Kod anda sepatutnya kelihatan seperti dibawah
6. Save template anda dan lihat hasilnya.:)
-----------------------------
Anda juga boleh melihat tutorial versi english di sini.
http://www.google.com/support/blogger/bin/answer.py?answer=154172
thanx kepada -•»Á®ÐZMÀ®Ñ«•- kerana inform pasal ni.